The first step in creating a DV360 campaign with Campaign Manager (CM) assets is uploading the assets to CM. But hold on, before doing so we need to create the campaigns, placements, and ads to categorise those assets, and here's how that's done.
Campaign Manager
Creating the campaign
Open Campaign Manager and head to the desired advertiser – this will take you to the campaign level
- Click on "New" to create a new campaign
- Name the campaign
- Select the date range of the campaign (this can be amended at a later stage) Before and after the start and end dates, only "Default web apps / Default in stream ads" will be served
- The landing page is set at campaign level Ideally, you would apply UTMs at this level
- Floodlight lookback window takes the default of the advertiser, but it can be overridden
- Save
Remember, all settings can still be changed later.
Uploading the creatives
- At campaign level, hit "New", and either do a batch upload, or select the creative type you wish to upload
- For a batch upload: Select "Batch Upload"Select "Creative Assets" and upload the desired files If uploading rich media ads, you will need to upload a backup standard creative of each of the rich media ads dimensions – for example, if uploading a 300×250 and 320×480 HTML5 ads, you will also need to upload 300×250 and 320×480 jpg/png adsBy default, the ads will take the name of the files uploadedSave
- For individual uploads: Select the creative type desiredName the creativeHit "Add assets" and upload desired assets In the case of rich media creatives, you will also have to upload the backup creativeIf the creative has not been given a name yet, it will take the name of the file uploadedSaveOutside of the placement's dates, the default web ad will be showing
Creating the ads
- For the purpose of serving ads on DV360, we will be creating "Standard Ad" "Click Trackers" are used to record clicks on content, creatives, or text that is otherwise not hosted on Campaign Manager"Tracking Ads" serve a similar purpose, but also records impressions
- At campaign level, hit "New" and select "Standard"
- Name your ad, a best practice is to include the dimensions in the ad name
- Scroll down to "Creative assignments" and select the creatives to assign to the ad You can assign more than a single creative, and they will be shown according to the rotation setting set at ad levelFor a sequential rotation, you can set the order of the creatives at ad level
Creating the placement
- Once in a campaign, hit "New" and select "Placement"
- Select the site on which the ads will be shared with (usually, only a single site will be present by advertiser)
- Name your placement, and select the "Compatibility" (format) For "Display", you'll have to select a "Dimension"You can select multiple dimensions, but it is best practice to select only one per placement
- You can select a placement's start and end date, and if not it will be inherited by default from the campaign-level
- By default, the campaign will create a "Default web ad" with a creative that fits its dimensions You can replace this creative by clicking on the "Default Web Ad" and hit the "Replace default creative" button and select the desired creativeThe default creative will serve outside of the campaign's flight dates
- Head back to specific ads and assign them to the desired placements Only the placement that match the dimensions of the creatives of the ads should be showing
With the set up now complete in Campaign Manager, let's look at the process of creating a campaign in DV360, and how to import CM assets into DV360.
DV360
Creating the campaign
- In DV360, navigate to the desired advertiser
- Select "New Campaign"
- Name the campaign and set your goals and details It is generally best practice to keep the naming consistent across DV360 and CM to make reporting more consistent
- If required, you can tick more than a single asset type in this menu
- You'll have the option to set your budget here, where you can also choose to set a phasing to the budget Otherwise, the budget is set at IO (insertion order) level
- Select your campaigns settings and targeting
- Note that brand safety also ensure that your ads are shown in a "safe" context, although it does limit the delivery of your ads
- For prospecting, it is a good idea to set keywords that are relevant to your products or service in the "keywords field" of the campaign creation user interface This will deliver ads in contexts that are relevant to your products
- As we have already set landing pages at campaign level in CM, these don't need to be added in DV360
Creating the insertion order
- In DV360, head to the campaign in which you want to create an insertion order
- Hit "New" and select "Insertion Order"
- Select "Real-time bidding" and name your insertion order. As with campaigns, it's best to keep naming convention aligned with CM – a good idea here is to name the insertion order after the CM ads from which it will draw its creatives
- Select your pacing, goal and optimization strategy For the "Flight" options, select "ASAP" for a burst campaign, "Even" for a distributed spend (long term), or "Ahead" for medium-term campaignThe "Daily" option mirrors the "ASAP" and "Even" options
- Under targeting you will find a small "Add targeting" option – this is where you can add an audience that you'd like to target Audiences can be first-party audiences (remarketing), third-party audiences (custom-curated affinity audience), Google audiences (in market/affinity) or any combination of the 3First-party audiences may take a while to load – it is often quicker to use the filter option to search for the desired audienceIn a remarketing effort, it is also best to create a single IO per audience
- Save
Creating a line item
- In the same campaign view that created the IO in, hit "New" and select "Line Item"
- Select the type of line item This needs to match the creative type we will be importing from CM
- The line item settings are similar to those of the IO By default, it inherits all its settings from the IO, though they are not necessarily shown here
- Targeting expansion is a way to grow the targeting by "loosening" the targeting On first-party audiences, it is equivalent to also targeting close lookalikesTo add targeting expansion when modifying the line item, it is necessary to re-add the audience to the line item as a target
- Under the budget settings, you will find the option to assign the placements from Campaign Manager
- Line item's (or placement's) creatives will then be reviewed before serving
Now we've got everything set up, it's time to turn both of our marketing platforms on. On CM, set your campaign, placement, ads and creative live, and then as soon as the placements have been approved on DV360, set the campaign, item order and line item live. Once you start showing impressions, that's when you know that you've successfully launched your campaign.
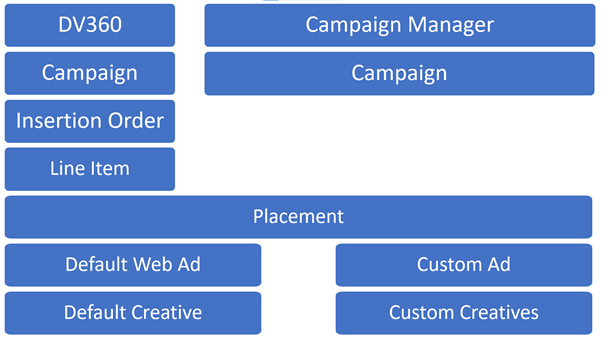
If you'd like to find out more about CM & DV360, head over to my last blog post where we looked at the two Google Marketing Platforms, what they're made up of, and how the two interact. I hope this guide has been helpful, and stay tuned for more CM & DV360 tips!
Pierre Daudré-Vignier, Senior Account Manager
Ready to improve your performance?
Reach out to one of our team to learn more about our services and how we can help your business thrive.
Talk to us